Before I get into the details of the software, I want to make some points about how this code needs to run. This code needs to be, if nothing else, bulletproof. If it hangs, crashes, or otherwise behaves erratically, it could cause you to lose the match. More importantly, it could seriously harm yourself or others.
Battlebots are not toys that can be used recklessly. Even beatleweights can break bones, and anything heavier can easily kill someone.
Meltybrains put your code directly in charge of the drive motors. If you screw up, the bot could take off unexpectedly and hurt someone.
As an example, an early version of our handheld controller had the dead-man switch wired in a normally-closed configuration, such that holding the switch opened the circuit. This was a huge mistake; if something else caused an open-circuit (say a broken solder joint), the robot would become enabled!
Sure enough, the controller ended up developing an intermittent connection that caused the robot to suddenly enable and drive at random. Luckily spin mode wasn't coded in yet, so no damage was done. But it was a scary reminder of why you need to really think through the systems you're building.
How to build bulletproof code
That header opens up a massive can of worms. This is a constant topic in all of computer science, and I can't possibly hope to do it justice here. What I can do is give some practical tips that I've utilized to make my own bot safer.
I'm going to focus on arduino throughout this post. I used arduino, and I suspect that most people reading this with the intention to build their own Meltybrain will likely do the same.
Synchronicity
Say you are listening for messages coming from your controller. They come in on your serial line, upon which you figure out what it means and do something with it. There are three ways to code it:
Way 1: Blocking

println() reads in bytes until it reads in a newline character, after which it returns the full array of bytes as a string. This is an extremely simple method, so most new coders start here. The big problem comes from what your code is doing while println() is waiting for the newline: nothing! Your code will happily sit there forever waiting for the newline to arrive.
This method is a synchronous, or blocking method. Meltybrains need to crunch numbers much faster than your communicators and sensors can give them to you, so doing nothing while things finish wont get you far.
You can get this method to work by using an RTOS, but that brings its own set of headaches, so I won't recommend it to a new builder.
Way 2: Polling
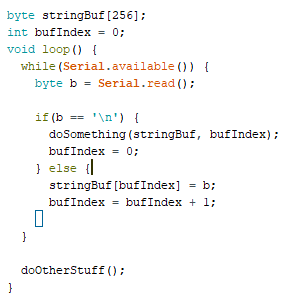
This method periodically checks to see if there are bytes available. If there are, the bytes are downloaded and stored for later. If a newline is received, all of the stored bytes are sent to a function for processing and the buffer is reset.
This is called a polling loop, and is our first asynchronous method. It's also the method I use most in our bot. It allows you to do other things while waiting for a slower event to complete.
The downside is that if something else blocks your code (forces you to wait), you wont receive any messages until your code un-blocks. The best way to make this style work is to make sure none of your code can block for too long. This is sometimes difficult, so we have a third option:
Way 3: Interrupts

Notice that the code looks pretty similar to way 2. The primary difference is that instead of placing it in loop(), we have placed the code in serialEvent(). serialEvent() is a special name that tells Arduino that this code is an interrupt service routine, or ISR. ISR's are sections of code that run when something happens. The function above runs any time our device receives bytes over the serial connection.
Since the byte handler automatically runs, we don't need to constantly check if we've received any bytes as in the polling example. This can save us even more time to do more important things. Also, the processor drops everything it's doing to run the ISR. So we will receive bytes even if the code is currently blocked! The original code resumes after the ISR has completed.
That last note is also the weakness of this strategy. If you receive too many interrupt events or your ISR takes too long to run, you can end up spending all of your time in your ISR instead of running other code. So you need to manage your interrupts carefully, and limit how much code you put in your ISR.
Watchdog timers
Despite our best intentions, "stuff" happens. Our code can crash or end up in weird places, and we may be powerless to save it. There is something we can add such that if our code goes kaput, the robot still safely carries on: watchdog.
Watchdog is a timer that constantly counts down. If it ever hits zero, your processor resets. Normally that's bad, but you can prevent it from resetting by "feeding" the watchdog. This resets the timer, but doesn't stop it. As long as you keep feeding the watchdog, your processor wont reset. But in the off chance that your code freezes, the watchdog will "get hungry" and restart your processor. You can also make it do things right before the processor restarts, such as turn off your motors. Useful! Instead of getting into it here, I'll point you at this excellent writeup of implementing watchdog in arduino.
I highly, highly recommend you implement a watchdog in any battlebot that runs code. If your processor freezes without one, it's likely you wont be able to disable your bot. This is incredibly dangerous! No one is a good enough coder that watchdogs aren't useful.