Despite the skill of my mechanical-mastermind-of-a-partner Pierce, there just isn't a whole lot of space for circuitry. We found that a custom PCB was the best solution.
And that PCB has a lot of stuff
Radio: Xbee Series 1
I wanted a radio that allowed a serial stream through, and I wasn't sure how powerful it needed to be. That makes the XBee series the perfect hardware for the job. 2.4GHz with enough channels to make event organizers happy, and modules of several different power levels for any arena size. Beware though, they are 3.3V logic only!
Processor: Teensy 3.2
Running at a screaming 72MHz, this ARM-based microcontroller has all of the power I need, and is arduino-compatible to boot! It also has better timer peripherals than the standard arduino board, which is great for applications like this. This board is 3.3V only, which is compatible with our XBee, but incompatible with many other devices, so beware.
Accelerometer: H3LIS331DL
You may recall in my last post that accelerometers in a ring bot must measure extremely high accelerations. Our PCB will experience g-forces well over 300g's! This chip is the only easily-available one for the job. The device only comes in the painfully small LGA-12 package, so novices should stick to the sparkfun breakout board. 3.3V only.
Infrared Reciever: TSOP75xx
This handy little receiver comes in several different versions for different receiving frequencies. It outputs a low signal when it sees an IR pulse at the correct frequency.
LEDs: APA102C
These are RGB LEDs that can be daisy-chained to allow for easy control. I can control the color and brightness of all five LEDs using only two microcontroller pins! Meltybrains only really need one single-color LED. But we're feeling ambitious, so we are going to use the five to display text and simple graphics using persistence of vision. They are 5V only, however, so I need to use a voltage-level translator (NLSV2T244) so that the Teensy can talk to them.
5V Regulator: TS30015
I use this part at work a lot, so it made sense to use it here. It's cheap and robust, but only comes in a QFN package. There are a lot of regulators that can be used here, it's really down to personal preference.
3.3V Regulator: TPS62172
Again, just a simple buck converter that I use a lot at work. Careful, this is only rated to 0.5A, so more powerful radios may be too much.
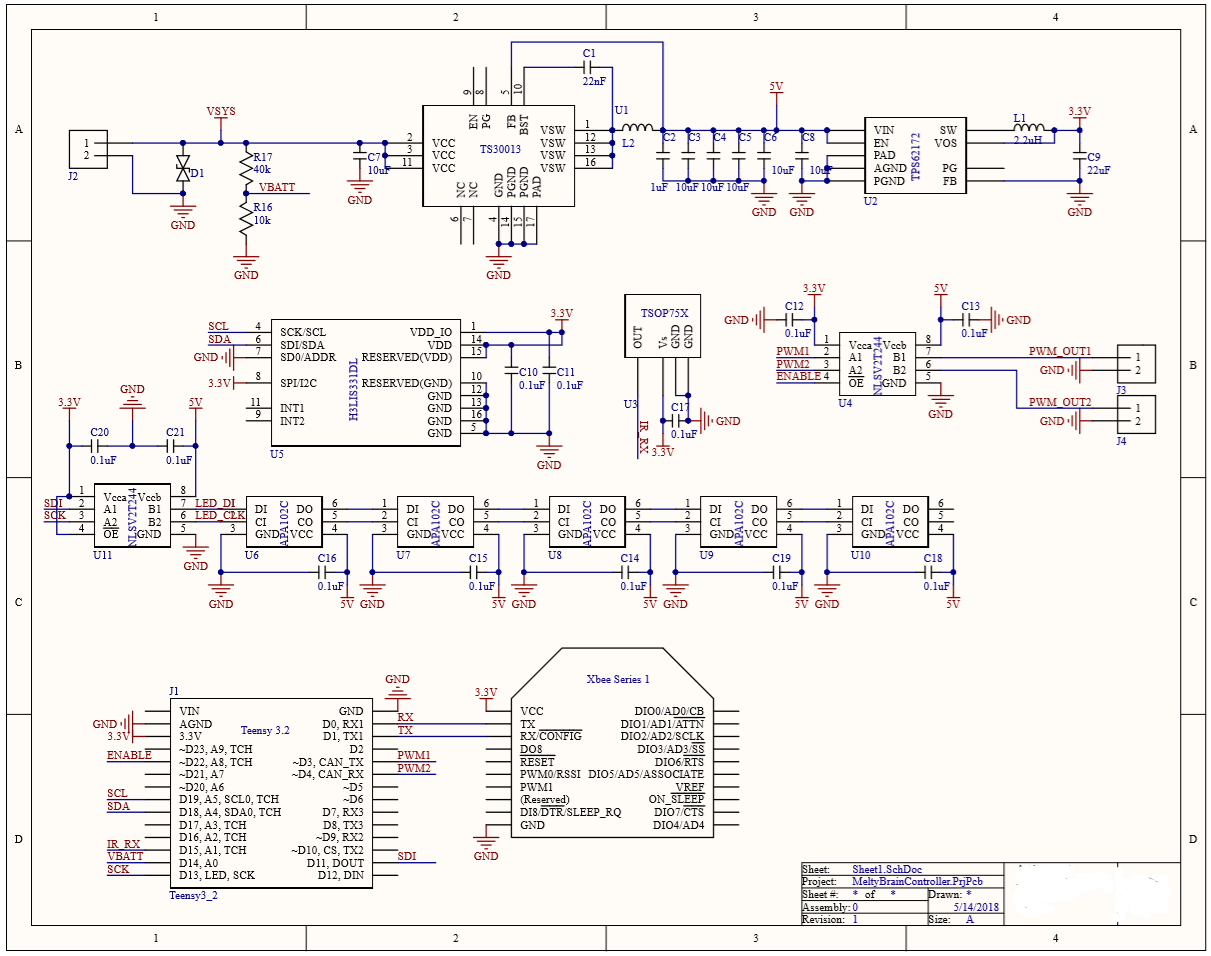
Full schematic
Small mistake here, U11 pin 4 should be connected to GND
I don't mean to imply this schematic is the be-all-end-all here, there are a lot different approaches that can be used. For instance, instead of XBees you could use standard RC radios, which may be cheaper (though harder to feed into the arduino). Making sure everything can operate off of the same voltage level would simplify this schematic quite a bit as well.
Layout
Nothing too crazy here, as all of the annoying layout work is done for us in the Teensy and XBee modules.
If the surface-mount packages daunt you, the voltage regulators can be swapped for through-hole modules (See this 3.3V one or this 5V one). Though I hope you have more space than I did if choose to make the swap.
I would upload these design files, but unfortunately they were made in Altium and are not easily read by the average hobbyist. Future projects will be done in KiCad.
Now for the big stuff
Sensors and radios are great and all, but we still need to move stuff.
Motors
We are currently using two 750kV brushless outrunner motors as our drive motors. They are rated for 35A, and at maximum free speed they would rotate the ring at 11,100 RPM. Now, that free speed definitely won't happen (it doesn't factor in how much torque the motor needs to provide), but the specs are reasonable given our 2,500 RPM target speed.
Motor selection is not easy for a direct-driven bot. We need the wheels to go fast since they are so far out-of-center. This implies brushless, especially since brushless power density is unmatched. However, in this weight class, it is very hard to find a sensored brushless motor. And sensorless motors have trouble at low RPM, leading to much higher spin-up times.
But the biggest reason we picked brushless was mechanical. Brushless outrunner motors are really slim. And with some tricky design you can mold a wheel around the casing of your motor. This greatly alleviates the problems with moment arms pointed out in the previous post.
Electronic Speed Controllers
We needed ESCs to match the power ratings of our motors, which lead to the Readytosky 40A. Running standard BLHeli firmware, they accept 5V PPM inputs. We ended up desoldering the barrel jacks to save space and weight, instead direct-soldering the motor leads to the ESCs. The PPM signals are easily generated by the Arduino Servo library, but we had to use another voltage level translator so that the Teensy could talk to the 5V ESCs.
Batteries.
Add up all of the power draws, and it comes out at 80A max discharge rate. That kind of scary current can only be supplies by a lipo battery, and a big one at that. So our battery pack is a little oversized. We use two 2000mAHr 7.4V Li-Polymer batteries in series, giving a total pack voltage of 14.8V. The batteries are actually heavy enough that they provide the counterweight for our weapon tooth!


